Repairing AO Microscopes
Look, I'm all thumbs and can hardly screw in a light bulb, but it is possible to adjust and repair these scopes. Eldred Spell is working on a a site that can hold some of this knowledge. Until then, I offer this page as a holding pen for those things I come across. Hope it helps some.
Interested in seeing the official PM (Preventative Maintenance) check-list for a service tech from AO? Here it is.
First of all, download the reference manual and catalogs from my pages or the Reichert page, or Gordon's pages, or wherever you can find them (Note: If you have something I don't have, send it to me, or share it on your own page and I'll link to it).
Read them!
These materials have lots of instructions and clues as to how to fix, repair, and adjust things.
Know your Cat #'s: Catalog numbers are found in the reference manuals and catalogs above. The catalog numbers of parts are important because although there are lots of AO parts out there on 'store' shelves, they are mostly stored and found by catalog number. You'll need this number to communicate your needs.
Use modern lubricants: Read Ian Walker's Micscape article subtitled "Notes on refurbishing and the use of Nye special lubricants". Note: You can buy the lubricants mentioned, if you need them, from Micro-Tools.
Remember sometimes the simplest, low-tech solution is best:
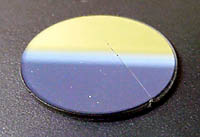
Example: Eldred Spell notes "I came up with a fix for my cracked ND filter. The AO's are metal coated and I don't think there's a chance of ever finding a replacement. I used my favorite windshield repair cement and a round coverslip. As you can see, I didn't quite get the glass lined up (I did really try), but I think it will be perfectly serviceable."
This post (message # 50210) on Yahoo's microscope forum might also give you additional ideas to creatively meet your needs. Charla Mason notes (referring to first surface mirrors, like the one above):
"The first surface mirrors are not easily to obtain. I have needed them myself. The best source for them I know of is to use the one in a Polaroid SX-70 camera. They are dirt cheep on EBay and optically near perfect. As for cutting them to a circle. That is some skill. When I did glass work ; mark the circle with a china marker with a template on the mirror surface and do as many straight cuts as you can then use a glass router table(stain glass hobbyist use them for any inside glass curves needed) it is with a small diamond wheel and gently follow the china marker line. Someone in the group might know a better way to do a glass circle."
Below is a hodge-podge of instructions on how to do things -- sorry it is so anemic, but I hope to be able to link to other's pages when they become available and decrease my coverage of the repair aspects (remember, I'm all thumbs).
Click on a link below to jump to a topic, or scroll through all of them.
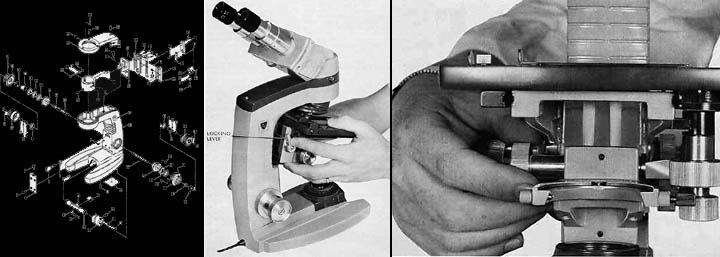
Sometimes the slideway assembly on the Series 10 head can become loose or have other problems (a scope I won from ebay suffered this problem). Eldred Spell offers the following tip:
"The adjustment on the series 10 head is very easy. You just remove the plate over the thumb wheel (four small splined hex-drive screws -- Matt Brin advises using a Torx wrench (a T-6) as splined hex tools are hard to find and the T-6 is readily available and fits well) and loosen the four slotted screws on the same side as the thumb wheel. Then, while pressing in on the piece under the screws (this takes out the play), retighten the screws. 'Should take under five minutes. If you have a really tight grip you might be able to make things bind. In that case, just loosen the screws and repeat with less grip."
Later, Eldred wrote: "I just realized that the instructions I gave you for tightening a loose series 10 head are slightly off. It's not necessary to remove the four small screws, but it is necessary to remove the main screws and open the head. This is a little touchy because it opens the interior to dust and the thin lever that connects the two halves can get bent.
Having got that far, it is a simple matter of loosening the gib screws (one set on each side) , pressing the gibs in and retightening."
Matt Brin has kindly written an expanded procedure for this below:
1. AO scopes seem to have recessed seats for their machine screw heads that are slightly smaller than most flat screwdriver blades. I found a small craftsman screwdriver with a 4mm blade width to work well enough. A slightly larger blade might be better (and slip less often), but the standard blade width of 6mm (or 1/4 inch) is just too big.
Read all of the rest first before starting, so that there are no surprises. All you need is the screwdriver mentioned in 1 above.
2. Remove eyepieces from their tubes and place them face up and out of the way on a clean surface.
3. Just below the point where the binoc/trinoc head joins the rest of the scope is the knurled screw that allows the head to turn. Loosen this screw two full turns and remove the head.
4. Set the adjustable tube to an intermediate setting (such as 5) and hold the head steady with the eyepiece tubes pointed down and resting on a clean surface. The purpose of the intermediate setting on the focusable tube is so that the tubes lengths are approximately the same and the head is more or less level while you work on it.
5. Unscrew and remove the 4 screws holding the eyepiece tube assembly to the rest of the head. These are the screws whose heads are pointing straight up if you are holding the head as in 4. Hold the eyepiece tube assembly tight to the rest of the head for the next step so that it doesn't slip around (or worse fall suddenly) since it is still connected to the rest of the head by an internal lever that is easily bent.
6. Place the head on a table with the entry lens (the lens that is not visible when the head is on the microscope) facing up. It will help if the head assembly is shimmed so that the eyepiece tubes are horizontal. With the trinoc head, this took 4 ordinary (thick) CD cases. With the binoc head, it might take only 3.
7. Carefully and slowly separate the eyepiece tube assembly from the rest of the head. A lever connects the prism housing (part of the eyepiece tube assembly) to the entry lens assembly. The screw that attaches this lever to the prism housing should have its head facing up.
8. Note which hole in the prism housing the lever is attached to. On my assembly there are two holes.
9. There is a spacer under the lever where it attaches to the prism housing that will try to roll away when the screw is removed. Hold on to this spacer when loosening the screw. Unscrew the screw holding the lever to the prism housing and put aside the screw and the spacer under the lever. The eyepiece tube assembly can now be handled safely.
10. Hold the eyepiece tube assembly with the the eyepiece tubes pointing down and resting on a clean surface. Turn the knurled dial so that the eyepieces are as close together as possible. This is to make the next adjustment more reliable.
11. Each eyepiece tube rides between two rails (gibs?). For each tube, one rail is integral with the assembly and one is adjustable. The adjustable rail for one tube is held with 3 screws. Thus there are 6 screws in all. If only one eyepiece tube is loose, you only have to deal with three of them. On my head, the three screws were loose for one side, accounting for the shift in the adjustable rail and the consequent play in the eyepiece tube.
12. Loosen the three screws for the rail to be adjusted about 1/2 turn each.
13. Hold the eyepiece tube assembly in a pinch grip with thumb and forefinger so that the adjustable rail is held tightly against the plate to which the eyepiece tube is attached. Do not use more pressure than you can get with thumb and forefinger.
14. Turn the three screws holding the adjustable rail in place until they just barely seat, and then tighten them slowly by tightening each a small amount in succession and repeat as needed until they are quite tight. If you have an over tightening personality (such as mine) you will slip on one and remove a sliver of metal from the screw head. Carefully get rid of the sliver so it does not fall into the scope and be more careful with the other screws. If you do this with two screws, your personality is even more tightly wound than mine.
15. Check the adjustment by (a) turning the knurled dial through its full range a few times to insure that there is no binding in any part of the range (there should be none if you only used finger pressure while holding in the adjustable rail), and (b) trying to wiggle each eyepiece tube while holding tight to the rest of the eyepiece tube assembly. Be careful of the prism housing while doing this. You can gently check the tightness of the screws on the other rail at this point if you did not need to adjust it.
16. Put the eyepiece tube assembly back on the stack of CD cases and re-attach the lever. The spacer goes on the hole that you have remembered in the prism housing, the lever goes on the spacer, and the screw goes through both. Make the screw moderately tight. It should bottom out in its hole before it binds the lever. The lever should turn freely under the screw head after tightening the screw.
17. Bring the two parts of the head back together so that the sides line up nicely and, while holding the two parts together tightly, return to the position with the eyepiece tubes pointing down and resting on a clean surface.
18. Replace the 4 machine screws that hold the two parts of the head together by first putting them in loose, and then tightening slowly as in 14 while holding the two parts of the head in alignment.
19. Replace the head on the microscope by tilting it in and tighten the knurled screw that holds it in place.
20. Replace the eyepieces.
Fine focus isn't working -- try this from Eldred Spell:
Don't remove those plugs!!!
" Those "plugs" on the back of the 4 hold the entire stage assembly (all three sets of dovetails) to the arm. Once loosened, alignment to the stage is gone. It might not make a huge difference to the casual user, but I wouldn't touch those unless I had a good technician to put things right afterwards. If you loosen those screws and botch the alignment, the first place you'll notice it is in the condenser movement. When racking the condenser up and down, it will also appear to move to one side."
But here's what you can do:
(1) Place scope on table - right-side up with arm facing you
-
traditional old-fashioned orientation.
2) Turn LEFT FF wheel counter-clockwise until it hits the
stop. The
internal thread is left-handed, not that it matters. The stop
should
be sudden and feel solid. You want to set it as tightly as
you dare.
If the LH knob unscrews, just grab a screwdriver and tighten
the screw
while holding the knob in place. The Stage FF should now be
at it's
lowest position.
3) Carefully loosen BOTH set screws on the bottom back of the
FF
assembly - one on each side. (note: I believe these
take a 1/16" allen wrench)
4) Gently slide the FF knobs to your LEFT, until the stage
begins to
rise. You don't want either knob to rotate. If that happens,
you'll
need to gently rotate the assembly from the left knob CCW
until you
feel a slight resistance, then CW just a degree or two.
5) Retighten set screws on both sides and you should be IN
BUSINESS!!!!
It worked for me -- you might give it a try.
 --- In Microscope@yahoogroups.com,
"mitospore" <mitospore@y...> wrote:
--- In Microscope@yahoogroups.com,
"mitospore" <mitospore@y...> wrote:
>
> refer to photo posted 29/nov/05, Jim Suth. shows back arm structure
of
> Microstar-4 scope. Do you know what the function of these 3
"plugs"
> two upper & one lower (:) might be? Also the name of the tool that
> might be used for removal or adjustment? Any recent forum info
> received in regards to my fine focus problem...knob moves freely with
> no resolution change, does not show any schematic or address the
issue
> for this specific model. There is info but it does not comply with
the
> configuration (parts/structure) I have. Most likely what is needed
> would be "service manual" info used by a technician. Any help is
> appreciated. Thanks, Jim S
>
 Set
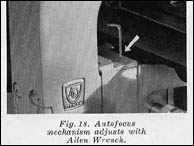
The Autofocus Stop: But, if the fine focus works fine ;-)
but, after raising the stage all the way with the coarse focus, you can't
'reach' focus with the fine focus -- you need to set the Auto-Focus stop (again
use a 1/16" Allen wrench). The procedure is well described in The
Effective Use and Proper Care of the Microscope, 1958, p. 13
Set
The Autofocus Stop: But, if the fine focus works fine ;-)
but, after raising the stage all the way with the coarse focus, you can't
'reach' focus with the fine focus -- you need to set the Auto-Focus stop (again
use a 1/16" Allen wrench). The procedure is well described in The
Effective Use and Proper Care of the Microscope, 1958, p. 13

| Above is an example of an eyepiece vs. objective cross-reference found in many of the manuals. I've found the FOV data particularly useful in rough estimating object sizes without the need for a slide micrometer, reticle or calculations. |
Matt Brin offers the following on eyepiece cleaning:
Lens glass is hard, but softer than various substances (silicates?) found in paper. The only paper that will be free of abrasives is lens tissue. Also acceptable is pure cotton cloth, but lint will be an issue unless it has been washed a few dozen times. An old white t-shirt will do, or pieces of an old white sheet.
Anti-reflective coating is much softer than glass. Even lens tissue and cotton will not save coatings from over cleaning. The less you clean a coated lens the better. The best way to preserve coated surfaces is to simply not get them that dirty. Get in the habit of NEVER touching a lens surface with a finger. Skin oils are bad news for both coated and uncoated lenses.
Lens cleaning solutions are for removing grease or gum. Dust is best removed by a puff of air. Unless you can puff without spitting, the puff should come from an aerosol can or (if you are trying to save the ozone layer) a rubber bulb.
Lens cleaning solutions are very volatile. This seems good until you realize that whatever was dissolved in the cleaning solution is left behind when the solution evaporates.
Lens cleaning solution is also very thin and will penetrate into lens housings. Cleaning solution that penetrates the housing will leach out as it slowly evaporates and be a nuisance at best or, at worst, will soften cements holding elements in place or elements in compound groups together. The worst is not guaranteed to happen (it depends on the particular solution and cement involved) but is enough of a possibility to take seriously.
All of the above facts about cleaning solutions lead to the following way to use them. Put a drop of solution on lens tissue NOT on the lens, wipe the lens surface with the wet spot of tissue gently and quickly, and then remove as much of the solution as you can before it evaporates by wiping with a succession of dry spots on the lens tissue. Repeat if grease streaks remain. Practice makes this very quick.
Getting dust and grime out from the 0.25mm band around the edge of a lens is usually not worth it. That band is often not in the optical path and the extremes you have to go through to get it clean often put the rest of the lens in danger.
Most lens assemblies are hard to open. Most need lens spanners which can be obtained from photo repair places. Getting a spanner and using one is not recommended since alignment of elements is not something that amateurs should attempt. Objectives should never be opened. An objective that is permanently in a scope should never get its top element dirty. It might accumulate a small amount of dust in a year which can be blown out with a puffer. Cleaning the bottom surface (top surface in an inverted scope, I suppose) is heavily discussed in many places.
Eyepieces, on the other hand, are not such high precision items and the ones that open without spanners can be cleaned and reassembled with success.
The eyepieces that I have had in hand are the Cat. 138, the Cat. 176, and the Cat. 146. All are 10x WF. The Cat. 146 needs a spanner to open and will not be discussed. The others have caps that unscrew and are easy to open.
Both have a plano-convex lens at the top and a double convex lens at the bottom. The plano-convex lens is smaller than the diameter of the eyepiece tube and is self centering. (Think about it.) The double convex lens is as wide as the inner diameter of eyepiece tube.
Stand the eyepiece open end down on a clean surface and unscrew the top half while holding the bottom half steady on the surface. Carefully lift the top half straight up so as not to jostle the top lens. On the 138, the top lens is thick and can be lifted by the edges and placed aside. On the 176, the top lens is thin and can just be tipped out onto a clean and not too hard surface (like a desk blotter). The top lens of the 176 can even be tipped out onto the top aperture of the top cap that has just been removed.
On the 138, the spacer is above the rest of the tube, and on the 176 the spacer is inside the rest of the tube. The best thing to do with both the 138 and 176 is to hold the spacer in place and invert the tube so that the spacer is down on your clean surface. Now lift the tube straight up so that the spacer is left on the surface with the bottom lens sitting on it.
The lenses can now be cleaned.
The plano convex lens has to have the flat side toward the eye. Thus it is easy to get that in right side up.
The double convex lens has two sides and the 138 seems almost symmetric. I have not been able to detect a difference on the performance with the double convex lens put in either way on the 138. This is after many attempts to find a difference. If there is one, it is too subtle for me.
On the 176, there is a definite difference. My sample has a two element, glued group and the thicker and flatter element should go down (that is UP when inverted on the table). Putting the double convex lens in backwards will curve the plane of focus. This can be detected by using the lens on the scope to put in focus an object in the center of the field and then seeing how much the object goes out of focus when it is shifted to the edge of the field. If the effect is too subtle at first, try this experiment with the plano convex lens put in upside down. Then the effect is far from subtle. Even when the lens is properly assembled, there will be a slight shift of focus between center and edge. However, with an element in the wrong way, the difference is much larger.
Clean the double element with very little cleaning fluid and keep the fluid away from the cemented joint. Remember not to apply the fluid directly to the lens, but put it on the cleaning tissue or cotton cloth first.
In reassembling the lens, handle the elements only by the edges. If you can figure out how to maneuver the elements touching the elements with your hands that is good if it is safe. It is not worth dropping the glass in an attempt to accomplish this. Getting a tiny amount of skin oils on the very outer edges of the lens will not hurt since this part of the lens never comes into use anyway.
Reassemble the lens by reversing the steps above. The spacer goes on the table with the narrow aperture down on the surface. The double convex lens is placed on the spacer in the proper orientation and the tube lowered over lens and spacer. The tube and spacer are inverted while holding the spacer in place. This is easy on the 138 and on the 176, just tip a little to get a finger under the spacer. Now the plano-convex lens is put in with flat side up and the top part of the tube is lowered over all and screwed in place.
On a binocular scope it is best to do this one eyepiece at a time and compare the curvature of focal plane after doing the first eyepiece and before doing the second. If there is a large discrepancy in the curvature, then an element was put in upside down.
I googled a very interesting document that contains a lot of information of adjusting and repairing AO scopes in general -- looks like mainly AO 60, 50, 150, 160, maybe 10's, etc. -- not sure:
http://imaging.arl.arizona.edu/resources/downloads/lightteach.pdf
I've copied the information relevant to AO scopes below, but it has information on repairing other makes of scopes:
AO, Reichert, Spencer B&L
:7. No fine focus:
A. Focus doesn’t change, knob moves freely
1. Tip microscope on side.
2. Remove baseplate by loosening two screws, and sliding to the rear, lifting
tab if necessary.3. Check fine focus actuation, as you turn fine feed, does the cam move.
4. Check to see that the fine focus gear mechanism gears turn as the fine
focus knob is turned. If not the whole fine focus mechanism may have tobe disassembled to discover the problem.5. Check to see that the fine focus gear mechanism is engaged with the gear
sector on the cam. If not proceed as below.A. Release C clip on right side of focusing shaft.(with the microscope
tube facing away from you)B. Slide plastic spacer, metal washers and cam all the way to the right.
C. Set the fine focus all the way counterclockwise.
D. Move cam gear sector to rear of the fine focus cam engagement gear.
E. Push cam gear segment (left) over fine focus cam engagement gear.
F. Slide (left) spacer over cam, slide washer to the left.
G. Replace C clip.
H. Test to ensure that the fine focus knob moves the cam.
I. Replace the bottom plate of the microscope.
6. Test with a slide to see that fine focus works.
8. Rough or jerky fine focus:
A. AO type focusing nosepiece
1. Remove 2 (-) screws in head of microscope
2. Remove carefully head
3. Tip microscope on side.
4. Remove baseplate by loosening two screws (-), and sliding to the rear, lifting tab if necessary.
5. Check fine focus actuation, as you turn fine feed, does the cam move smoothly.
6. Remove 7 (+) screws from top of microscope.
7. Remove top plate and set aside.
8. As you actuate the nosepiece, does it slide freely and smoothly. Add grease to the ball slides down the sides of the microscope focusing travel. Manually push the nose piece up to distribute the grease along the slide. Any grease would do. Lube gel from Radio Shack is one example. Manually actuate the focus. Does it move smoother.
9. Replace top plate and tighten 7 (+) screws.
10. Replace baseplate and tighten 2 (-) screws.
11. Replace head and tighten 2 (-) screws.
12. Check to see that fine focus is smooth.
9. Fine focus doesn’t track, or course focus jammed: Setting the objective stop
1. Turn microscope with stage facing away from you, slide in place, low mag.
2. Loosen set screw on right coarse focus knob. (Allen or Bristol Spline)
3. Turn fine feed to mid travel (possibly 5 turns)
4. While holding right Coarse focus knob, turn left all the way counterclockwise.
5. Rotate left coarse focus knob until slide is in focus.
6. Rotate right coarse focus knob clockwise until it stops.
7. Tighten set screw on right coarse focus knob
8. Check to see that focus stop doesn’t allow any lens to strike the slide.
NOTE: If the knobs are completely out of adjustment, loosen both set screws, rotate both knobs clockwise until they stop, tighten both set screws and start at step 2 above.
10. Relamping:
Those microscopes which have a hemispherical lens below the condenser may take a GE 15 watt, 120V standard base bulb available at a hardware or electronics store.
1. Loosen two screws (-) beneath base and slide metal base plate to the rear, lifting tab if necessary.
2. Remove metal base plate.
3. Remove burned out bulb.
4. Examine wires leading to switch, lamp socket, and cord for signs of fraying or burning. Repair or replace if necessary.
5. Replace bulb. Clean lamp envelope if necessary.
6. Replace metal base plate and tighten screws (-).
7. Turn on lamp to ensure that it works.
Gregg
I have a 110 stand. I remember you saying they weren't exactly your
favorite AO compared to the 10. This 110 has a fine focus that
requires about a 3/4 turn before engaging in either direction. Do you
think I could yank this thing apart and make an adjustment or does it
sound like something is broken? Could something be frozen?
Thanks
Frez
----------------------------------
Hey Frez,
Good to hear from you!
The mechanics of the Series 110 aren't the problem, the weak point is the in
base halogen illuminator. Otherwise, it is a pretty decent scope, and yes,
if I was presented one, or one became available at the "right price", I
could cave in.........8>)
The Series 110 focus mechanism is somewhat similar to the Series 10, but it
has been a long time since I've had my mitts on one. I suspect that with
cleaning and relubrication, you should be able to solve the problem.
Being a "gravity feed" design, the first place to look is the nosepiece /
arm assembly. When you push up on the nosepiece and release, does it drop
right back down, or does it "slowly" drop back into place? If it drops
slowly, this may well indeed be the culprit - and no need to remove the
coarse/fine mechanism. Pull off the top plate (plate where the binoc. fits
into), and to free things up I would use some teflon based spray lube
(conservatively, of course) on the dovetail and ball bearing slideway, and
the roller bearings above the nosepiece. Exercise the mechanism up and down
by pushing the nosepiece up with your finger, until it follows your finger
on the way back down. Re-assemble and see how resonsive the fine focus is
now. I would bet a cold one that this is the problem. Ultimately, for the
best repair, a complete cleaning of the bearing race and re-lubrication with
a fine (0 or 00) non-drying grease would be ideal.
Let me know what you see............
Gregg
----------------------------------
Greg,
Your note was timely. I just overhauled a Series 10 for my nephews to
use. Initially, I just wanted to pull the knobs off to soak in ammonia
and detergent so that a scrubbing would get the lab smut out of the
grooves (this was the recommended technique from a long-time scope
tech). But the right hand coarse focus (the one with a retaining
ring) was stuck on a scratch caused by the setscrew. First time with
these things, so I thought "I'll just remove the spindle - that'll be
easy!".
One advantage of complete dissassembly was being able get rid of the
dried grease and dirt in the bearing races. After I put the thing
back together, I couldn't believe how nice it worked. Got an idea of
how one of these performed from the factory. Super! I did break a
brass bearing retainer and had to fab one out of brass shim stock.
(Pics at BozPics in the photo section.)
I used SuperLube to regrease the bearings and races. Has Teflon(r) in
it. Any opinion on this stuff? What is your source for 0 or 00
non-drying grease should I decide to overhaul one of these in the future?
Thanks,
Jim
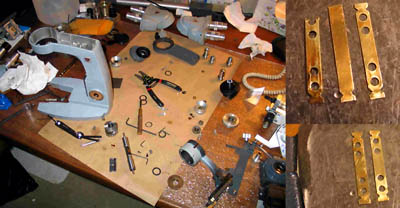
(Pictures courtesy of James Bosley )
----------------------------------
Gregg,
I bought a Model 10 that was doing the "Sloooow drop". I took out the lenses
and removed the stage, condenser, and light source, for safety, and then
dissembled the body from the stand and cleaned sparingly and carefully with
WD40. I put it back together and it is now smooth and responds well to the
focusing imput. What type of lubrication should I have used? Name brand? Is
using WD 40 on a sludged up microscope ill advised!
Jack
----------------------------------
Hi Gregg, while we have you on the subject of AO 10s and 110s. I currently
have my AO plan phase optics on a very nice AO 110. I've heard about the
problems with the halogen illuminator base but so far I don't seem to have
been affected with my AO 110. I have also come across a very nice AO 120
with the external 100w illuminator. Did the 120 illuminator have similar
problems or does having the separate illuminator housing avoid the base
problems? I thinking it would be better for me to switch my phase setup
over to the AO 120 and I was just wondering what you thought of that.
Kind regards,
Wallace Kelley
----------------------------------
Hello Jack,
The WD40 will loosen up old grease, but is know for becoming lacquer-like
with time. Also, others on this forum have noted that it has a tendency to
out-gas some chemistry, which puts an oily film on the lenses - so you have
to be careful, or avoid it's use, if possible.
Plasti-lube is a personal favorite grease for use on the microscope,
although there exist a number of acceptable alternatives.
Glad you were able to get your unit going - now you can take it to the "next
level".
Good luck,
Gregg
----------------------------------
Hello Wallace,
The Series 110 problems were unique to the first 14 or so months of
production (1980 - 1981). Many that failed were replaced with "improved"
units under warranty. As a hobbyist and collector, my concerns with the 110
would be buying a unit that was indeed early and not replaced. The
additional concern is that the lamp socket is unique and most likely rare
and difficult to replace.
The Series 120, however, is a completely different animal. It had a well
ventilated lamphouse, with the separate remote power supply. Heat was much
more efficiently dissipated with the 120, when compared to the 110. I have
never encountered any longevity problems with the 120 100 W light source,
and the lamp socket is common to other applications, facilitating simple
repairs.
For Phase contrast, I would suspect the additional intensity of the 120
would be a tremendous benefit, especially for photomicrography. On the 110,
you would be rheostatting the intensity up quite high for phase, which would
put a strain on the electronics, lamp socket, and bulb. I would indeed
consider switching your phase outfit to the 120 platform.
Happy observing!
Gregg
PS: I am the proud owner of 3 AO series 10's, and would sure love to have a
Phase outfit on one of them!
----------------------------------
Hello Frez,
You may have a "timing" adjustment to do - might be as simple as sliding the
focus assembly a bit to the left or right. Otherwise, the whole focus assy.
will need to be removed. There is some tweaking required to get everything
timed just right, so try to avoid the complete removal until nothing else
has worked.
As you go, take some photos - I may be able to guide you, with your photos
as "memory joggers". If it is the same as the series 10, there are double
set screws hiding behind the stage support casting, which lock the focus
mechanism in place. You will need to remove objectives, then slide the
stage and it's support off of the dovetail, to reveal these screws.
Cheers,
Gregg
----------------------------------
Howdy Jim,
I like Plasti-lube, however any non-drying grease in similar viscosity
should suffice. I have heard good things about SuperLube, and I like Teflon
based products in general.
I have three AO series 10's presently, and I have overhauled the coarse/fine
focus mechanisms, and mechanical stages, of all three. I have the advantage
of being factory trained by American Optical (albeit 27 years ago), so these
babies are a walk in the park compared to a Leitz or Olympus celestial clock
drive type mechanism. Two of these units will be offered for sale at some
point (one a complete trinocular unit, and one a basic monocular or
binocular, have parts for both).
You should be able to run your "pinkie" finger over the fine focus knob with
no resistance to rotation. Your nephew's have a cool Uncle, indeed!
Kind Regards,
Gregg
Mr. Neeley,
I found your web page including detailed repair information for the AO microscopes, and you invited input to other repair and parts sources for these microscopes. JSD at Keck Science Center has numerous AO-60s in teaching labs, and the fine focus has malfunctioned on some due to stripped threads on the nylon bearing (AO part # 60-207).
After contacting microscope parts suppliers without finding any, we decided to have an injection mold made for this part in order to repair our scopes. I have installed them in three AO-60s so far and they work fine.
Please look at the nylon bearing ad on our web page, http://faculty.jsd.claremont.edu/wcook/ao60/.
We would greatly appreciate you linking to this page on the Joint Science Department web site. Since we need to recoup the cost of the injection mold, we cannot offer these free, though.
Walter Cook, Scientific Instrument Technician, Keck Science Center, Joint Science Department ,925 N. Mills Claremont, CA 91711
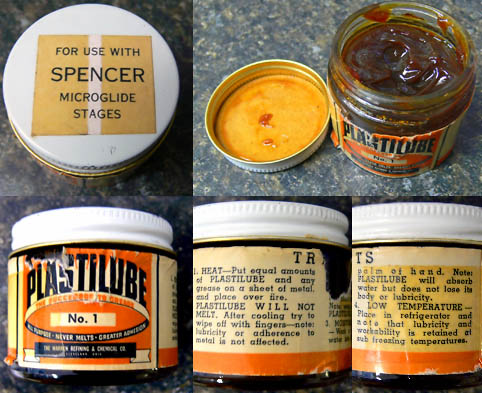
Plastilube -- historically the 'thing' for microglide stages
Eldred Spell shares, in a picture, proof of the historical lubricant for microglides stages. I'm sure that many others would do today. Sure looks like the stuff Mom used to use on my hair as a kid. ;-)
Re-cementing and Re-aligning Cycloptic Prisms
An interesting thread on Yahoo!'s Microscope forum (click here to see the thread) discussed re-cementing and, if need be, re-aligning the prisms in the Cycloptic Stereo Microscope. I don't know that I would do any of this myself because I know that having a qualified tech do this is just not that expensive, but below is the gist of the conversation:
"Hello Jim and Stephen,
For the epoxy step - I would encourage the use of 5-Minute epoxy. Easy to mix and use, minimal odor, and can easily be peeled away should reconditioning require the complete re-cementing of the prisms. I was trained by American Optical professionals (back in 1979) to re-cement prisms (using a jig fixture to properly position the prism) with commercially available 5-minute epoxy, and barring a serious jolt - this epoxy will last for many years.
The biggest challenge, if the prisms need to be re-cemented, is aligning the eyetubes for perfect binocular alignment - which we can cover in another thread (if required!).
Good Luck,
Gregg
----- Original Message ----- From: Jim Bosley To: Microscope@yahoogroups.com Sent: Saturday, August 26, 2006 6:55 PM Subject: [Microscope] Re: Refurbishing AO Cycloptic stereoscope
Stephen,
Welcome. I have a Cycloptic and find it very enjoyable. Put a spider under the lens and it's incredible!
I'm pretty new at this, so I am putting my methods out as much to help as to solicit criticism from experts on this site, some of whom have years of professional experience to back their statements. Here you go:
1. Grease removal. I have found two approaches to grease removal work well. Neither is solvent-less. Perhaps you can do this on the patio table outside? Neither is recommended near lenses that may be cemented, but the first is less agressive. Method one is to use mineral spirits (naptha, VM&P naptha, paint thinner, NOT lacquer thinner). Use the minimum amount, work in a well-ventilated space, and use q tips soaked in the stuff to get into edges. This works, but may be slow going and you use a lot of q-tips! If you are impatient, you can move to method two, which involves carburetor cleaner (B-12 Chemtool, available at Walmart). This is a mix of very strong solvents, and will decement lenses and can take some paints off. You need gloves, should work outside, and be aware of possible damage. On the other hand, I've found some dried/oxidized grease to be intractable to everything but this.
If someone forced me to try something that doesn't smell like a refinery, I might try d-limonene, the stuff that they sell to remove sticky stuff like the adhesives from price stickers from glass. Anyone with experience with this "Goo Gone"?
At the risk of showing my ignorance, I've used two types of grease on my scopes. One is SuperLube, the other is Slick 50 One multipurpose grease. Both have Teflon(TM) fluoropolymer additive. I think that Superlube is silicon-based. The Superlube is less viscous. Both have been working well.
2. Gluing down prisms. I wondered myself about whether gluing the prisms might be a good idea. Depending on what the other responses are, I plan to follow your lead Unless you get superceding info from Gregg, Gordon, or other experts, I would avoid standard epoxies. I believe that the most appropriate product is "Milbond", available from Edmund Optical. Unfortunately, it comes in larger-than-practical-for- home-microscopists cans that are pretty expensive. Now, I had purchased some Norland lens cement, and the Edmund folks said that it would work fine in gluing down beamsplitters, so it might work for our prism application. It's UV curable, but unless you live in Scandinavia and are doing this in winter (or at night), I suggest that you use the large UV source that is free to us all. Larger tubes of Norland are $22, alas. Maybe someone has a cheaper idea...
All the lens/beamsplitter apps I've seen use dots of cement to hold them down. Do these discontinuities minimizes thermal strain? For my beamsplitter, I've just put a drop of the Norland stuff down at intervals and set the assembly on a pie-pan in the sun to cure. Are the prisms currently held with spots, or with continuous cementing? If spots, I plan to put the Norland (or whatever) on either side of each of the current attachment points.
3. If you can get the rusty parts away from the optical elements, you can use WD40 and scotch-brite pads. I've also used naval jelly (phosphoric acid) and muriatic (aqueous hydrochloric) acid too, but your family might object to the odor of naval jelly, or to getting a snoot full of hydrochloric fumes. Muriatic is an extremely powerful chemical - completely inappropriate for kitchen table work. I suggest that you not use it. Like I said, WD40 and scotch brite pads work surprisingly well. And the WD40 gives some rust protection. If you do get the rust off to your satisfaction, a product called Boeing TP-9 is supposed to be the best rust preventative around. Seems to work for me.
Might be easiest to buy new screws!
4. High power, low contrast. I found that I had poor quality until I cleaned the optics. I you have hit both interior and exterior to the cycloptics barrel, I don't know what the deal is.
If the barrel interior needs cleaning, you do so by getting some optical cotton (your old lens tissues might work) and a moderately stiff piece of insulated wire (20ga.?) and can fashion a swabber that will be able to reach every surface through the open hole in the cycloptic barrel. Double the wire back on itself so that there is no sharp cut end at the tip. Wrap a tight loop around the cotton with the doubled wire, then bend the loop so that it is perpendicular to the rest of the wire (your handle). Make a swab for lens cleaner (and use a minimal amount, and one for drying. Anyway, that's how I cleaned mine. My high-power lenses are out of alignment, so if anyone has a procedure to fix that....
Good luck and good views. Sounds like you got a great deal.
Jim"
Also,
"Hello TMT,
Not for the faint of heart, but here goes:
First, it is important to recognize the (1x, I believe) setting on the Magna-Changer, if your Cycloptic is so equipped. This is the lensless position on the Magna-changer tumbler. Here, we can achieve true binocular alignment - if any of the other positions on the Magna-Changer are out of alignment, it might be the individual lenses requiring adjustment.
OK - we are at the 1x position on the Magna-Changer. Now, we will need an eyepiece with a crosshair reticle - and a stage micrometer, or other accurate reference to focus on - preferably with a 90 degree crosshair in the center. Use modeling clay or Silly Putty, we position the stage crosshair parcentric to the eyepiece crosshair on one side. Move the eyepiece with crosshair to the opposite eyetube, and you will see the magnitude of your out of alignment circumstance. Factory specification for most stereo scope alignment is .001" in X-axis, and .003" in the Y-axis. The reason for this is that the human brain can accommodate lateral mis-alignment much better than vertical mis-alignment.
The lack of infinite wisdom on behalf of American Optical engineering (or their intention to create planned obsolescence!) created a nightmare of the next step. The eyetube, at the base, is filled with an alloy similar to solder. Using a propane torch or similar, you must heat up the tube until the alloy becomes molten, and move the eyetube with eyepiece until the crosshairs are parcentered. Moving the eyetube can be accomplished with gentle taps of a small brass mallet, I recall also using rubber gripped pliers to assist.
If your scope has been re-aligned before, or too many times before, the alloy could indeed be gone. In this case, you must disassemble the eyetube assembly, use 5-minute epoxy to replace the alloy, and you now have 5 minutes to align. When you are happy with your effort, hold the tube in position until the epoxy cures.
Once you have aligned the "empty" position, you can check each magnification alignment using the same stage micrometer crosshair, and crosshair eyepiece. If any position requires re-alignment, you will want to remove the magna-changer knob on the side of the detent (click-stop), so you can slide the magna-changer out, make small adjustments to lens position, and reinsert to check.
By the way, by moving or pushing the eyepiece in the eyetube, you can get a feel for which direction the eyetube needs to be moved (or the lens in the magna-changer). Good luck with this - let us know how you fare!
Cheers,
Gregg"
Lamp Centering Screws on the Series 4 Base
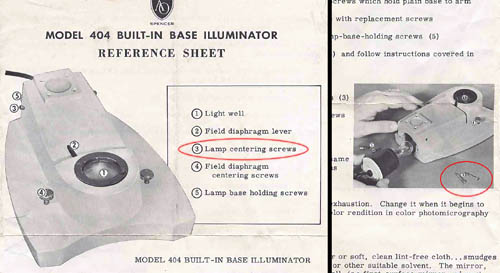
Question: "This AO 4 scope is missing the two screws at the back of the base, just below the focus knobs, that are used to center the illuminator. Do you have any idea what size screw they would be?"
My response: "Are you sure these are not just access holes for a small (maybe 1/16") hex wrench?"
Retort: "On pages 25 and 26 of the AO 4 catalog, they are shown as screws and referred to as "lamp centering screws". I assumed they were true screws and not some sort of screw-headed wrench."
Eldred Spell's knowledgeable response: "I don't have a Series-4 illuminator handy. If memory serves, the screws fit a 3/64" Allen wrench, which makes them a 4-40 thread.
Lowe's or Home Depot should carry these. Try to get 1/2" length if possible. Set screws come in several tip configurations and most are designed to cut into the target. The AO screws have round, polished faces which are designed to slide smoothly over the illuminator housing. If you can locate a flat-faced set-screw, that should work right out of the box. Otherwise, you'll need to put the screw in a lathe (or electric drill) and use a fine file or stone to round and smooth the tip.
AO did use non-standard threads in their Phase Condensers and these take the same size wrench. If you run into that thread, the practical approach would be to re-tap the holes to a standard size - either 4-40 or 4-48. It's not difficult to do, but if you break off a tap it's serious trouble."
Steven Born on Yahoo's Microscope group offers this suggestion (message# 34013)
"I recently had to replace the rectangular mirror in the "Transilluminator Base" of my AO Cycloptic stereomicroscope. The mirror is mounted in a rectangular plastic frame; the opposite side is white plastic, a separate piece of material.
Problem: the mirror is thinner than any mirror sold at a glass shop.
The solution? Go to an automobile supply store, purchase replacement sections of mirrors for truck side mirrors, and have it cut to size. AO camera lucida mirrors are the same thickness."
AO Series 10 coarse focus locked!
A question on Yahoo's Microscope group offers advice on this problem (message# 36694)
Question: "I recently purchased an AO 10 stand, but the coarse focusing mechanism is blocked. Which is the probable trouble and How can I access the focusing mechanism?"
Gregg Kleinberg answered: "Sounds like the timing is mal-adjusted on your stand - if there is not a more cataclysmic problem. Timing is set by rotating the entire coarse / fine mechanism, until the coarse focus can be driven from one hard stop to the other, without losing the pawl mechanism. To access the lock to the coarse / find assy, you first must remove the objective lenses, and the nosepiece. Next, remove the stage assembly by removing the 'Auto-Focus' button head cap crew (stainless, on top of the stage dovetail), then loosening the stage clamp and lifting stage carefully until the stage comes off the dovetail. Behind the stage mount you will see a set screw on each side of the dovetail - these lock the focus mechanism into place. I would try a small rotation one way or the other - then lock and test. This way, you can minimize your time to adjust."
Matt Brin answered: "It can be easier than that. With the stage facing you, loosen the set screw on the COARSE focusing knob on the RIGHT. Now you can rotate that knob to new positions with respect to the shaft while keeping the shaft from turning by holding onto the LEFT focusing knob. If the set screw has gouged the shaft so badly that the right focusing knob wont turn freely on the shaft, then Gregg's technique will have to be used. If the knob turns freely, then different positions can be tried until things are in the right range."
Another similar question on Yahoo's group (message #50014)
Question: “I recently purchased an AO Series 10 microscope off of eBay. There was no mentioned of a stuck coarse adjustment in the ad, so it's not DOA, I can't justify returning it (also, once shipping is factored in, it's not worth returning). Everything worked well on the scope except the coarse focusing. It locks in the downward travel, so I can't go very far with it. I was able to focus by moving the stage up. I have posted two photos on my Picasa site to show what I have done. It's not ideal, so that's why I am asking for advice here. I have done research on the AO manuals and catalogues site, and tried the advice of loosening the screw on the right knob and turning the knob. One of my photos shows the screw I loosened. That didn't seem to work. Another piece of advice I read was to take off the stage and adjust the screws in the dovetail holding the stage. I have not tried that yet. I decided to post this query first.
Gregg answers: “It sounds like the "timing" of the course focus worm screw gear is off – you will need to remove the double set-screw which holds the bronze mandrel (behind the coarse focus knob), and rotate until the worm engages the ball - then lock the mandrel back in place. The mandrel has a stop-screw so that the ball cannot pass the preferred range of travel. I know I am over-simplifying due to time - but the point is, this is indeed a recoverable situation. This is NOT a problem with the stage mounting dovetail - however, to find these set screws (there is one on top of a second to prevent movement), you will have to remove the lenses, and possibly the nosepiece, to remove the stage from the dovetail.”
Norman answers: “I had a similar problem. The problem is most likely dried lubricant gumming up the works in the helical groove that is part of the course focus or dried lubricant gumming up the focusing slider mechanism in the upper body of the scope. Once you see it all working you'll know what to do. There is also a rolling ball mechanism that moves up and down depending on its position in the groove. If this mechanism has dried out lubricant in it it will be stuck. You need to have access to all of it to clean out the gum and re-lube. Firstly, don't mess with course focus. If you force it it will break the ball mechanism. If you are not mechanically inclined, don't attempt this repair. Just get another series 10.If you are mechanically inclined, carefully remove the top of the microscope and remove the mechanism that moves the nosepiece up and down. Check that it moves freely, you may need to clean and lube. This alone may solve your problem. If not, remove the stage and the stage carrier. This will provide access to two large bolts that hold the ball that fits the helical groove in place. Remove bolts and remove ball mechanism. Clean and lube. If ball is broken, you're out of luck. With the focusing mechanism removed you should be able to see large helical groove from the top of scope. Check that it moves freely and is free from dried lubricant. Use xylene or lighter fluid to degrease. You should not have to disassemble course or fine focus to clean and lube the above referenced parts. Once everything is clean, reassemble. The mechanism is pretty simple and you should be able to get it working again. The whole job should take 3 - 4 hours at most. Once again, If you like doing this kind of thing, its fun and educational. If not, it can be bothersome and aggravating. You need to consider if this is worth your time, however. Series 10stands are plentiful and cheap and it may be more worthwhile to just get another stand.”
Matt answers: “I agree with previous posters. I just want to emphasize, NOT to remove the screws holding the main dovetail on the body. Doing that will mess up the main alignment. The only thing removing the dovetail accomplishes is that it allows you to remove the follower lever for the main screw. I have never seen a follower that needed removal. I HAVE seen problems with just about everything else. I will repeat what the last note said. If you are mechanically inclined and have the exploded views from the AO manuals, then you can do this. If not, buy a body. You first have to decide which of the diagnoses is right. Has the follower jumped out of the groove, or is it just dried grease, or is the stop post on the main bearing out of position? Only you will be able to tell that. Unless the grease is totally solidified, you will not have to disassemble the main worm assembly. That would be a major pain and add hours to the work. It is also tricky to get the two blocks out that hold in the ball bearings. Try to avoid disassembling the bearing assembly in the high part of the vertical stem of the body. This is another alignment point. Lastly, work where the ball bearings cannot escape.”
Problematic AO 150 mechanical stage
In Yahoo! Microscope thread: 37942 , Matt Brin explains what can be done:
I have taken several AO scopes apart down to the individual nuts, bolts, and bearings. My qualifications for this is having done the same thing to several bicycles (using "anybody's bike book" by Tom Cuthbertson as a guide) and having overhauled four or five automobile engines using the shop manuals (and Muir's book on VWs in the case of one VW and one Porsche) as guides. With this background in fine tooling :) I felt totally qualified to deal with the mechanics of a microscope. The exploded views from the manuals on Steve Neeley's page were used for the scopes.
The bottom line is that if you are at all mechanical, you can do it. You will occasionally have the odd spring loaded bearing jump out and roll under your heaviest piece of furniture (as Muir predicts somewhere), but if you are very careful, you can keep that to a minimum. You can get into serious trouble if you open something up that affects optical alignment. You just have to think about the consequences of various moves. It is usually obvious what will do this. Unbolting various dovetails is usually a dangerous step.
Your problem is with the XY mechanisms. This is a completely detachable item on the 150 and cannot mess up your optical alignment. Removing two bolts from the side of the stage puts it in your hands. Each direction involves two race and ball-bearing assemblies. The ball bearings are constrained by spacers that ride along with them. You probably have to loosen screws on one or more races, hold the race moderately tight against the bearings while retightening the screws. On an assembly I happen to have here, this looks like a job of loosening and retightening 4 screws in the direction towards and away from the back of the scope, and the same operation in the direction across the scope from side to side. The amount of available adjustment is small (holes for the heads of the screws are very slightly larger than the heads themselves), but is designed to be adequate.
From http://www.reichertms.com/ref_man.php you can download the reference and parts manual for the 150. It gives a completely inadequate parts view of the XY assembly. I guess this assembly was considered to be easier to replace than repair, or perhaps the 150 was not regarded as a scope that would be used by the technically knowledgeable. It was sold as a student scope. My assembly is a bit stiff and I plan to "eventually" open it up, clean out the old grease, re-grease and reassemble it. "Eventually" probably means "you should live so long" so I would not wait for me to relay my experiences.
If you are not that mechanical (no backgrounds with hot rods, motorcycles or bicycles) and the discussion of bearings and races means nothing to you, then just keep and eye out on eBay. These things show up irregularly and sell for reasonable amounts.
--- In Microscope@yahoogroups.com, Mike <hml@...> wrote:
>
> Thanks, loafer. And thanks to Scott, too, who also responded. I've > scoured
the page you mentioned, as well as many other pages, and there > doesn't seem to
be much discussion of mechanical stage slack. So, I > would find it helpful to
know if this is something that everyone just > ignores. I will probably make a
stab at partially disassembling the > stage mechanism to see what I can learn.
More specifically, the problem > is that the mechanism levers the slide upward
when the X-Y knob is touched. >
Arthur, on Yahoo's Microscope group, gives this helpful response (message# 41053)
"It's very common for a medium power objective to become "contaminated" with (usually) oil. When it's there inside, it's very hard to see. The displaced iris image also tell me that there is an oil problem. Usually, those objectives are not sealed like the oil objectives."
"Objective repair is tedious work. Normally, an experienced worker would have a jig for a particular objective. This jig would allow holding the lens mounts and glass so that each lens can be rotated and shimmed for optimum resolution, thus being able to build up the objective. A novice in this work would not have access to the jigs and equipment involved, so we have to rely on the original factory build. Meaning that when you remove the lens stack from the objective barrel you need to scribe a fine line down the stack so that you can put each lens back in the proper orientation. Some lens stacks are accessed by removing the outer objective cover and others by removing the retaining ring in the rear and sliding the stack out. BE CAREFUL. Make sure each lens with it's scribed line lines up with all the other lines. Take notes!!! The order and shims must be written down or you chance losing everything. I wouldn't try this on an objective unless your willing to write off the whole exercise (and objective) as a learning experience. Don't get frustrated, take a break if you need to. In my experience, you have a 40/60 chance of rebuilding your objective and retaining at least decent resolution. If not.... well, you tried!"
Non-functioning Series 15/35 fine focus help
Matt Brin in a Yahoo Microscope group message helps on a fine-focus in free spin (message# 42356)
Re: Spencer 15/35 fine focus problem
This is very common. The grease in the fine focus assembly has hardened to the consistency of glazing putty. I have never opened a 15, but will "some time in the future." By and large AO designs are very good and easy to work with if you record where everything came from. Work in a baking pan to keep ball bearings from running away. If you have ever rebuilt a car engine or de-varnished a carburetor, you are well qualified for the job. There are very few hidden access points. The first you will encounter is how to get the coarse focus knobs off. This is done by grabbing both knobs and turning them forcefully counterclockwise with respect to each other. The bearings and bushings in the knobs that you will discover when you get one knob off are more complicated then you might imagine. If they don't intimidate you, then keep going. Keep a pad and pencil with you and record everything. You will be on your own. I have never gone farther than that with a 15. Reassembly will be close to impossible if you don't record where everything goes and most importantly the order in which they go. Shafts will have a surprising number of washers and bushings on them. After disassembling, the rest is cleaning, re-greasing and reassembling. The cleaning can take hours or days. Use whatever toxic substance you are comfortable with. I am conservative and won't go farther than rubbing alcohol (the higher percentage version). Xylene (lighter fluid) is mentioned a lot in this group. The grease to use for re-greasing can be debated endlessly. If you want to spend a lot, go with Nye greases ($90 for 10cc of grease in each of 5 viscosities from TAI at http://www.lubekits.com/?load=grease). If you are cheap like me, go with an automotive grease. I recommend Sta-Lub marine boat trailer grease SL3121 from CRC. It claims no volatile organic compounds and is about as odor free as these things ever get. You can get it at small parts Inc. http://www.smallparts.com/ under Adhesives & Lubrication-grease for about $5 for 14oz. plus shipping. It doesn't mix well with other greases (for example lithium greases) so make sure your cleaning is thorough. Lithium grease would also be fine, but they tend to be more volatile. CRC does make a low volatility lithium grease (white grease SL3151 from same place) but it is not zero volatility and does have slightly more odor than the marine grease. It is more familiar in that it is like the stuff you get for car door latches. It is hard to find other companies that give as much data as CRC, so while there might be better greases out there for as little money (among the half million commercial types available), I would have no idea how to find them. The Nye greases come guaranteed as appropriate for the use. If you do this, let me know how it went.
>> Hi all- I've acquired a Spencer 15/35 series binocular microscope with > non-functioning fine focus. The knobs are apparently disengaged: they turn freely but do not effect focus. The assembly lifts and drops smoothly about 1/8". Guessing this is not unusual for these old scopes, if anyone would care to suggest a course of action: is it 'off track' somehow, or what do I remove for a better look, I would appreciate it. I put up a picture in album 'Spencer Series 15 with ailing fine focus' <<
Series 10 eyepiece tube alignment
Arthur, from the Yahoo Microscope group, helps with an alignment problem.
“Thanks very much for your helpful advice. It took a few tries
but now have my eyepieces dialed in perfectly. To be honest, it didn't really
bother me too much but my son simply can't align the images when they are out of
whack. Part of the fun of these old AO scopes is how mechanically simple they
are. I've had almost as much fun taking them apart and putting them back
together as I've had using them! Thanks again for sharing your experience.”
“Well, I wouldn't usually respond to a question like this, but
I’ve learned that there are some that will do whatever they might to try a
repair themselves. I have used this technique while "in the field" and found
that it works well enough. Much like evaluating a pair of binoculars, you will
need to find a straight horizontal line, such as a long window sill on a wall or
other area some distance away. I would say about twelve feet or so. I have used
the lines on a cinder block wall. Then with the head held down, without the
lower casing and sliding lens attached, loosen the three screws on the upper
prism. Now, physically adjust the head so that when looking into both eyepiece
tubes from a foot or so away, you can see the horizontal (window sill) line in
both tubes (at the same time). This image of the sill, or whatever you might be
using, does not have to be precisely in the center of the field. Any
misalignment should show up as a broken line (window sill) between the tubes.
What I mean is, one line would be lower or higher than in the opposite tube.
Rotate that center prism until the line in each tube "appears" to be continuous.
In reality, the lines should show the same plane. Tighten screws and re assemble
the head and give it a try. This method will only correct one side image being
above or below the other side. It will not correct images that are crossed or
too far apart from the other. There are always more factors to consider playing
with the alignment of a binocular head. Usually one adjustment will cause an
error somewhere else, such as when adjusting the IPD. You might find that when
the IPD is set at the narrowest position and the images are correct, this might
all change when the IPD is widened. Hope at least some of this helps! Arthur
Jim and Matt give an owner of a troublesome prism lever some advice . . . here.
Re: AO Trinocular head I 2nd the caution with respect to the spring and ball bearing. It's used to insure no rattling around of the (tube?) lens on the bottom of the unit, as that lens moves up and down to compensate for changes in the interocular distance. Look on the drawings available on Steve Neeley's site (get the AO Series 10 stuff, and in the back of the manuals is a part's list/exploded drawing) to ensure you know where the spring and ball are, and when you remove the sliding lens keep the bottom of the head pointed into the baking pan you are working over. I've always removed the eye tubes when I do this. They are held onto the body of the head by brass dovetails. Regarding dried up grease, on these dovetails and elsewhere, I used mineral spirits and a tooth brush or a cotton swab to remove the crud. Regarding the optics and mirrors (especially the mirrors) be very gentle cleaning them. A light blow from a bulb-type air blower, and then lightly drawing an acetone-moistened optical tissue across the surface of the mirrors is about it. Good luck, Jim "
Re: AO Trinocular head That page (this page, actually) does not cover the problem mentioned. The problem MIGHT be solved by loosening the two set screws on the lever that moves the prism and tightening them with the lever in a new position. If the problem is caused more by things being stuck than by their being out of line, then the unit will have to be opened. The page below covers how to open the unit. Once open, the head will be in two main parts. The page below covers the eye tube assembly more than the prism assembly. There is VERY little grease in the prism assembly. The mechanics there are easy to understand with a little thought. If you take out the intermediate lens, you will lose a tiny bearing and spring unless you are working over something like a baking pan. You will also have broken a seal locking an alignment shaft in place. I don't know how important that seal is, but hot glue very carefully applied has worked for me as a replacement. The silvered surfaces of the prism will be exposed. The silver is very easy to scratch. Be careful.
Hello all, I have an AO Trinocular head that I think has a problem. The lever to move the prism? away from the vertical tube only moves about 45deg. The prism does not move completely clear of the light path. I presume this is a problem. Can I take the head apart and re-assemble it without messing up the alignment? Also what solvent should I use to remove gummed up grease on the slides? Thanks, Simon
Matt Brin: It is not clear what the source of the problem is from the description. The "end of travel" problem would not account for the fact that the focus was suddenly way off. Something else might be loose, such as the stage itself. Buy the one-side-turns-and-the-other-doesn't does sound like the end of travel problem. The end of travel stop for the fine focus is one of the few design weaknesses of the series 10. The stop is accomplished by two pins on the turning shaft and one screw on the fixed casing around the shaft. At one end of travel, one pin hits the screw, and at the other end of travel, the other pin hits the screw. Both pins and the screw are round. If one pin grazes the screw instead of hitting it solidly, it can jam. Even worse, it can slip past. There is a brass nut in the assembly that can be adjusted so that both pins hit the screw solidly at both ends of travel. Adjusting this nut is a pain. The nut is locked in by a threaded lock ring which is non-stainless steel. This lock ring is often rusted and difficult to impossible to budge if the scope is old enough. Even if the ring is removed, the nut (about 1 cm long) is adjusted by a pair of grooves in the accessible end. Since it is on a shaft, a screwdriver wide enough to span the two groves is useless. A fine screwdriver on one grove will work if the nut is not frozen in place. Otherwise, a socket of the right size has to be ground down to work as a kind of spanner. The nut being brass (soft) can self destruct if it is too frozen in place before it turns. All this is accessible by removing the screw and fine focus knob on the side that is NOT engraved with a fine focus scale. But as I said at the beginning, this might not be the problem.
Matt Brin:
Swapping knobs is easy. The exploded views in the manuals will do infinitely
more for this discussion than anything that I can say in words. There are a
surprising number of parts in just about every corner of the scope. If you want
to try without the diagrams, then take two screwdrivers that fit the slots on
the knobs and (using them simultaneously) open the screws. Then write down the
order of the washers that you will discover under the knobs. You will not
encounter any fleeing ball bearings if that is as far as you go. If you open the
nose area, you will encounter ball bearings. I would not worry about a dry
feeling on the coarse focus unless it is binding (the nose refuses to or is slow
to drop under its own weight).---
>> It's quite possible that my scope's mirror knobs are stripped, although they don't appear that way when viewed under a magnifier. I'm at the point of grinding a new hex key wrench with a Dremel, but was hoping that there was an easier solution. The other specific problem that I'm trying to solve is that I have an arm (bought as part of a "parts" scope) which appears to need relubrication. The nose did not move freely, but I fixed that with some tri-flow (a light oil with Teflon added.) But, the coarse focus feels "dry." That's the only way that I can explain it. Other than that, the arm appears practically new. It must have sat in a supply closet for 40 years or so. I also have another arm which feels great, but the coarse and fine focus knobs have the appearance of corrosion, due to some exposure during their use. I was hoping that there was some simple way that I could just swap the knobs from the arm which is cosmetically good to the one which has the corroded knobs. Is this a simple thing to do?<<