 Zetec Power:
Zetec Power:
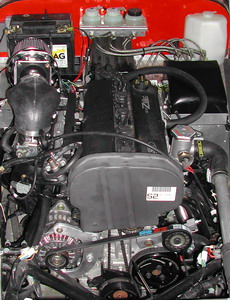
My Birkin Super-7 will be powered by the Ford, DOHC, 2.0liter, Zetec motor using the stock Ford PCM (power control module), Ford injectors, intake manifold and MAF (Mass air flow sensor). I obtained a low mileage (about 9,480 miles) Zetec from a 2001 Ford Focus. I purchased the engine and complete engine wiring harness and Ford PCM from South Bountiful Auto.
The stock Zetec flywheel is very heavy lump of steel at 22 lbs., so I decided to use a lightened version of the stock flywheel. I obtained the flywheel, clutch and pressure plate from Birkin Sport along with a hi-torque starter motor. Due to the tight engine bay, You can not install the starter motor until the engine is partially installed but no all the way in.
With the Birkin factory furnished Zetec installation kit(s) I began the installation. To shoehorn the engine into the early chassis you need to strip all accessories from the engine, including the harmonic balancer from the nose of the crankshaft and the plastic thermostat housing at the rear. You also need to remove the exhaust (throwaway) and intake (save) manifolds. You will also need a new oil sump. The stock Focus sump is too deep and will only allow about 1.75" of ground clearance once the engine is installed (I'm still waiting for an oil sump to become available that I like).
For details of the actual installation of the engine/transmission assembly, see the story on the T9 transmission, in this issue.
Other minor problems: Once installed in the chassis you will need to address a number of problems. You need an a new air filter, an alternator mounting bracket, a belt pulley tension adjustor, a water rail or revised thermostat mounting block, an adaptor to move the stock intake manifold 3/8" out from the block, and a throttle cable.
![]() The Intake Manifold:
The Intake Manifold:
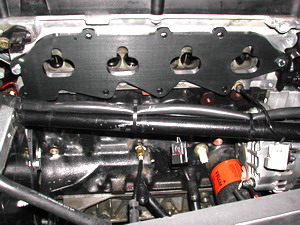
The stock Ford black plastic manifold would fit except for the left side engine compartment chassis brace. By moving the manifold outward 3/8" and removing the EGR port into the manifold, everything fits. I used a silver dollar size piece of aluminum and some RTV silicone to plug the old EGR port opening in the back of the manifold.
You could actually mount the intake without using the 3/8" spacer, but then you would not be able to retain the Ford idle control speed valve. I purchased a black anodized spacer from Birkin Sport in Vacaville, CA. The intake ports on the spacer are slightly smaller than the ports in the Zetec head and intake manifold. In the photo on the right you can see where I ported the spacer to match the head and manifold.
The Ford intake manifold ports were also slightly assymetrical. I did a little porting to match the manifold ports to the head and intake spacer. I did not open up the ports any larger than necessary because I want to keep the intake air flow moving as quickly as possible for the greatest amount of torque.
 NOTE: Be sure to hook up the oil pressure line before you install the manifold.
Throttle Cable
Since I would be using the stock Ford throttle body and injection system, I also used a Ford Focus throttle cable which I cut to length at the throttle end and retained all the stock black jackets. To install, depress the throttle to the WOT (wide open throttle) possition; move the throttle body lever to WOT; then pull the throttle cable tight and secure it with the small grub screw. Now release the throttle and verify that when depressed the throttle will open the TB all the way just as the throttle hits the throttle stop.
When you release the throttle you will notice that throttle cable becomes limp and that the throttle pedal can rattle around. I choose to add a closed throttle stop bolt to keep everything secure. I added this to the top of the throttle pedal assemble. You could also add a 90 degree angle bracket and bolt to perform this function.
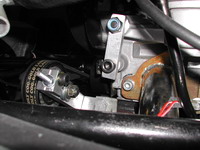
 Alternator mount:
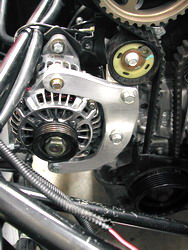
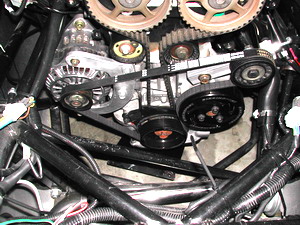
Birkin Sport sells a nice alternator mounting kit that includes the alternator, belt and adjustor. I already had an alternator (Geo Metro 55A unit) so a custom alternator bracket was the order of the day. The Birkin Sport kit is nice and would make the alternator installation a snap.
I built a C-shaped front mount and a T-shaped rear mount. You need to match the alternator pulley groves to the grooves on the harmonic balancer at the front end of the crankshaft. For my alternator that required moving the mounting point forward by 0.500". This alignment was accomplished with a short piece of 1"x.0.5" 6061 grade aluminum bar stock sandwitched between the C-bracket and the front of the engine. The C-bracket was fashioned from a piece of 6061 aluminum plate that is 3/8" thick. The aft mount was cut from 1/8" steel plate and welded to form a T-bracket.
With this mount, there is no interference between the alternator body, the angled engine bay brace or the oil filter. I can use any length oil filter, from the stock Focus unit to the shorter Toyota units. Initially I have installed a short "Extra Guard" filter #3614 (at least I think that was the number!) After about 500 miles I'll change the engine oil to Mobile 1 synthetic and replace the oil filter with the larger Focus unit.
NOTE: My Birkin was built in February of 2000. At that the stock wiring for the alternator routed the wires to the drivers side front of the engine. I installed my alternator on the passenger side under the cool intake manifold rather than on the drivers side under the hot exhaust manifolds.
 Alternator Belt idler and tensioner:
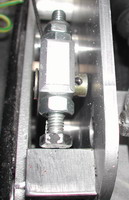
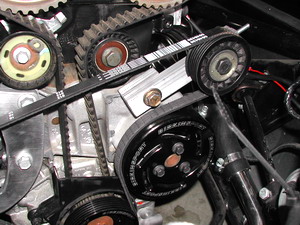
Originally I had planned on using the stock Ford belt tensioner, but with the location of my alternator this would have required a drive belt that was 45" long. The local auto parts stores stock belts that are up to 44" long or 46" and longer. No 45" belt was available!
To solve this problem I designed a custom idler bracket. I included in the design is an eye bolt that allows me to turn the nut on the end to tighten the belt. Once the proper tension is reached, the nut behind the idler pulley is tightened to hold everything secure. Again, I used grade 6061 aluminum to fashion my idler pulley bracket. The multi-V idler pulley was removed from the stock Focus automatic tensioner.
NOTE: In the picture on the left you can also see the Birkin Sport crankshaft pulley and water pump pulley. The crankshaft pulley is smaller to underdrive the alternator and save HP for use at the rear wheels (approximate 3-4HP gain at peak power). The water pump pulley is larger, thus allowing these two items to be installed without requiring a new belt. They are also lighter that the originals by a little over 3 lbs. which should equate to better acceleration, especially in the lower gears.
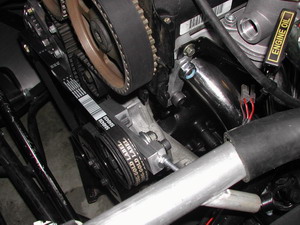
 Raceline Water Rail:
The thermostat housing on the Zetec motor is somewhat unique. It included a main coolant exit from the block to the radiator, a smaller exit from the block to the heater, an exit from the block to the water pump (bypassing the radiator) and a small bleed line that leads to the pressurized header tank. With the engine placement in the Birkin, two of the exits are blocked by a chassis rail. The thermostat housing needs to be relocated or replaced. Relocating the housing by moving it toward the center of the engine also requires moving the ignition coils.
For my Super-7 I choose to replace the thermostat housing with a Raceline water rail. This puts the thermostat near the front of the engine (port side of #2 cylinder). It also provides a threaded port for the radiator fan switch, two 1/8" NPT holes for temperature sensors and a 3/8" NPT port to feed coolant to the heater. What it does not provide is a radiator bypass port. To avoid hot spots in the engine prior to the thermostat opening, the radiator bypass plumbing is used to circulate the coolant through the block.
With the Raceline water rail this bypass circulation can be provided by three 4mm holes drilled in the edge of the thermostat. However this solution circulates coolant through the radiator which will likely delay the engine reaching full operating temperature. This should not be a problem on except on the coldest days - but who will be driving a Super-7 in the dead of winter??? Not me!
One additional problem with the Raceline water rail is the front mounting hole location (see photo on right above). The US 2.0liter version of the Zetec does not have a mounting hole that this location. I fashioned a 3" piece of 6061 aluminum to reach down to an existing 10mm mounting hole on the block. I also added a approximately 0.7" thick aluminum (yes 6061 again) washer to align the lower bolt with the water rail bolt hole.